Aerosphére Small / Large / Base


SOFTWARE UPDATE


OVERVIEW


Why do I need a software update?

Geneva releases software updates for the Aerosphére system to maintain compatibility with Apple and Androids’ latest developments, to add to new features, to improve performance, and to fix bugs.

How do I download the new software update?

The new software update can be downloaded using one of the following options:

– Update through the AeroSphére App (recommended).

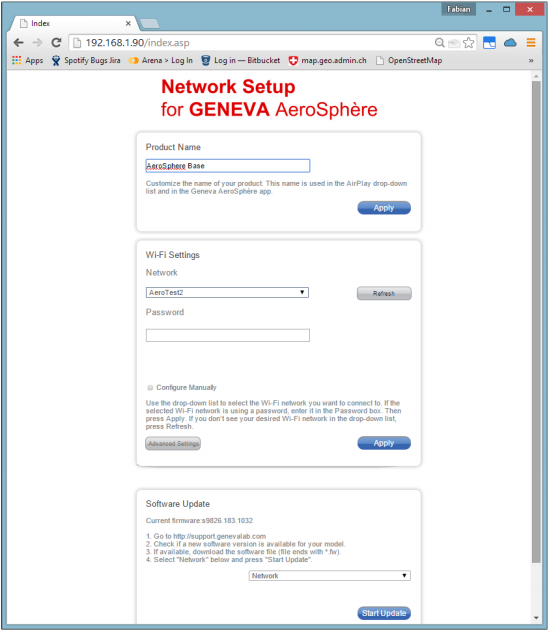
– Manual software update (through the “Network Setup” located on the AeroSphére web-page device). Please note that when updating multiple AeroSphére devices, each device needs to be updated individually.

When will the new software be available?

The AeroSphére will automatically check for updates. A notification of a new software release will be visible in the settings menu of the Geneva Aerosphère App.

Latest software versions

AeroSphére Small – Version 9846.133.1040

AeroSphére Large – Version 9846.276.1040

AeroSphére Base – Version 9826.183.1033


UPDATING THE SOFTWARE USING THE APP


NOTE: automatic software update has been added to the Geneva AeroSphére App starting from version 1.4. Make sure your app is updated to the latest version before starting the software update procedure.

Instructions

1 – Checking for new software releases:

1.1 – Make sure all your AeroSphére units are powered on and connected to the local network.
1.2 – Launch the Geneva AeroSphére App on an Android or iOS device.
1.3 – Tap the Settings icon.
1.4 – If a software update is available, the message “Software update available” will be visualized.

2 – Updating the software

2.1 – Tap the message “Software update available” to begin the download of the files.
2.2 – When the download is completed, tap on “UPDATE” to begin the procedure.
2.3 – Follow the instructions on screen. The entire process will take about 3 minutes for each unit updated. During this time, the LED on the unit will blink in a rainbow pattern.
2.4 – Upon completion the device will reboot itself. The status light on the device will turn to yellow, and then back to green. This confirms that the device is ready to use.

3 – Repeat the steps above until all the units are updated.

NOTE: Please refrain from doing any of the following, as it may result in an unsuccessful download:

– Do NOT EXIT the app during the update.
– Do NOT ANSWER PHONE CALLS during the update.
– Do NOT PRESS THE HOME BUTTON.
– Do NOT DISCONNECT the AeroSphère device from the AC power.


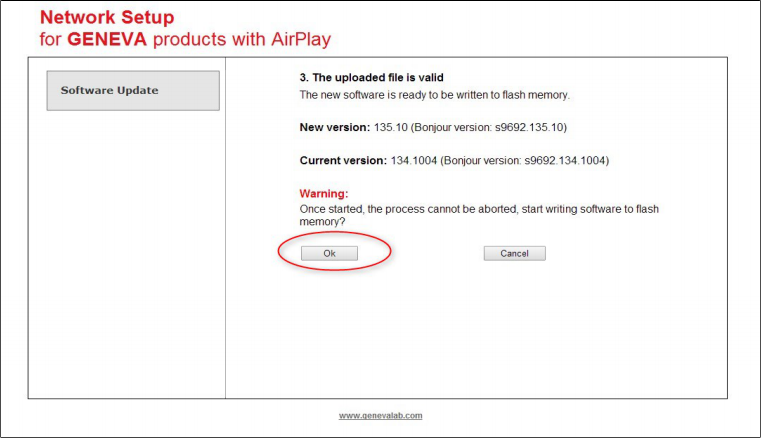
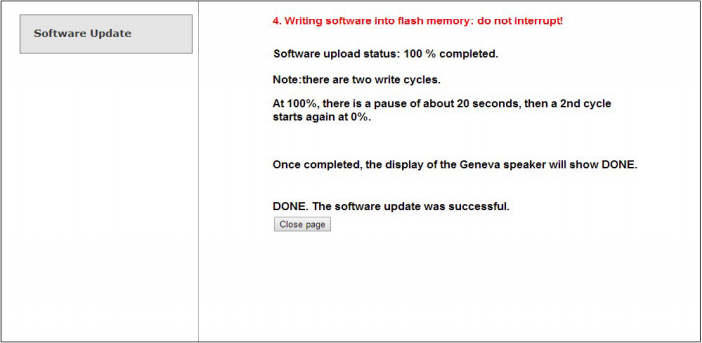
MANUAL SOFTWARE UPDATE


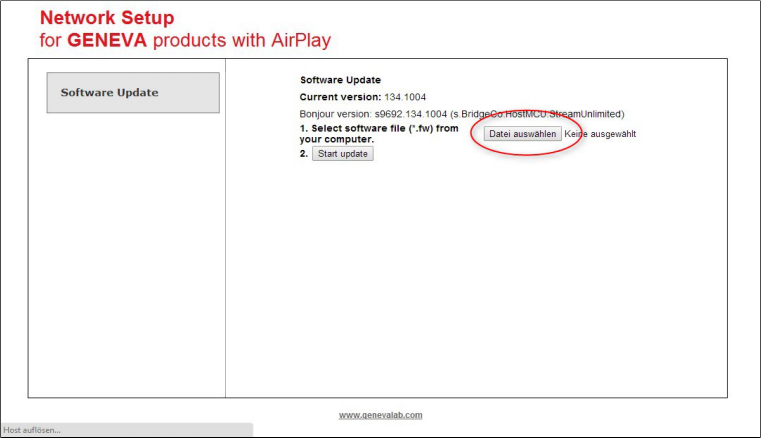
1 – Download the firmware files from the links shown above in this page.

2 – If you are running the procedure on a Windows system, read the following instructions. Skip to step 3 otherwise.

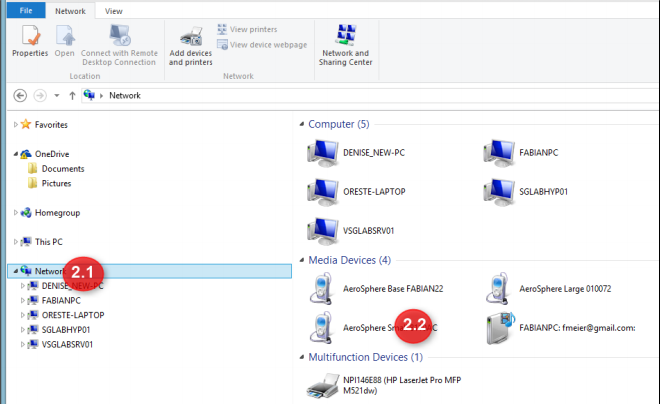
2.1 – Open a “File Explorer” window. Go to “Network”.
2.2 – Search for “AeroSphère” under the “Media Devices” tab.
2.3 – Double click on the icon of the unit to be updated.

2.4 – A webpage will pop up with the title “Network Setup for Geneva AeroSphère” Note: This webpage is running on your AeroSphère device.
2.5 – Skip to section 4 “Starting the update procedure”.

3 – Using a macOS system

3.1 – Open the Safari browser.
3.2 – In Safari, open “ Preferences” > “Bookmarks” (or Preferences > Advanced in older versions).
3.3 – Select the checkbox “Include Bonjour” (in older version click to check “Include Bonjour in the Favorites bar”) under the “Bookmarks” bar.
3.4 – Click on the bookmarks icon on the upper left (book icon) – the AeroSphère devices will be in the bookmarks view.
3.5 – Click the AeroSphère entry and the “Network Setup for Geneva AeroSphère” page will open.

4 – Starting the update procedure

4.1 -Scroll down on the “Network Setup” webpage of the AeroSphère device and locate the “Software Update” box.

4.2 – Under “Software Update,” use the dropdown to select “Network”, then click on “Start Update”. The LED on the unit will start blinking in a rainbow pattern.
4.3 – When the page loads, click on “Choose File”, and locate the firwmare files which have been previously downloaded.
4.4 – Click on “Update”.
4.5 – A progress bar will appear. Click on “Confirm” to continue the process.
4.6 – At the end of the procedure, the unit will reboot itself. The status light on the device will turn to yellow, and then back to green. This confirms that the device is ready to use.


TROUBLESHOOTING


ALTERNATIVE WAYS TO LOCATE THE NETWORK SETUP WEBPAGE

If you were not successful locating the “Network Setup” webpage of the AeroSphére device, there are alternative ways to find the IP address of the AeroSphére device.

Geneva AeroSphére app: The IP address for your AeroSphére App can be found in Settings > Speakers > Speaker1 > IP Address (i.e. 192.168.1.91).

Use an UPnP app: for example “UPnP browser” from Oppian on iOS, or “UPnP Scanner” on Android to find the IP address of the device.

Windows/Mac command line: Open a command window (cmd.exe) or a terminal (Mac OS X). Enter: arp -a You will see a list with IP addresses. The MAC address range for the AeroSphère devices is: F8:f2:5a:xx:xx:xx (G-Lab GmbH).

Use the iOS/Android app “Mocha Ping Lite” (free app):

1 – Select “Ping subnet”
2 – All valid IP addresses are marked in green.
3 – Chose a valid green address – if you see “State: received reply” and “Vendor: G-Lab GmbH” or “Hansong” \ the correct IP address is displayed. Document the IP address, as this information will be used in the next step.

Once the IP address is found using any of the methods above, enter the address in the internet browser of your choice, and the “Network Setup” webpage of the AeroSphère device will appear.

What discovery protocols are used to find the AeroSphére devices?
AeroSphère Small and Large: UPnP and Bonjour. AeroSphère Base: UPnP.


PROBLEMS DURING OR AFTER THE SOFTWARE UPDATE

Issue: I quit the app during the software update process.

Solution:
1 – Unplug the AC power cord of the AeroSphère device for 5 seconds.
2 – Plug in AC power cord back into the AeroSphére device and wait approximately 20 seconds, (The status light changes from yellow to green blinking).
3 – Restart the software update process again with the app.

Issue: After unplugging the AC power cord, the status light blinks in a rainbow pattern, and the device is unresponsive while using the remote control.

Solution: Seeing the status light blinking in a rainbow pattern indicates that the device is in “software update mode”, and prompts the user to upload the new software.

– If you performed a manual software update, press the refresh button on your browser, until you see the “Network Setup” webpage. (If this solution failed, go to the next step.)
– Start the AeroSphère app. If you can see the speaker in the list, go to Settings > Speakers > Your Speaker > and look for the “IP Address” value (If this option fails, refer to the next step).
– Start the AeroSphère app. Select “Software Update Troubleshooting”: this can be found in the help screen after the app has started. Another location is Settings > Speakers > Any Speaker > Software Update Troubleshooting. The last IP address used for your AeroSphère device is stored here. If this failed, go to the next step.
– Use an IP port scanner, (i.e. iOS/Android app- “Mocha Ping Lite” (see instructions above) to find the IP address. Once the IP address has been located, enter it manually into an Internet browser on your computer. Thereafter, the “Network Setup” webpage of the AeroSphère device will be displayed.
NOTE: The webpage may appear a bit different (as the webpage is in the software update mode). Follow the steps below.

1 – Click on “Choose File”/”Datei auswählen” and select the correct firmware file for the unit to be updated.
2 – Click on “Start update”.
3 – If the selected file is correct, the message “The uploaded file is valid,” will appear. Select “OK” to proceed to the next step.

4 – A confirmation message will appear upon completion of the procedure. The AeroSphére unit will then reboot and the status light will change to yellow.